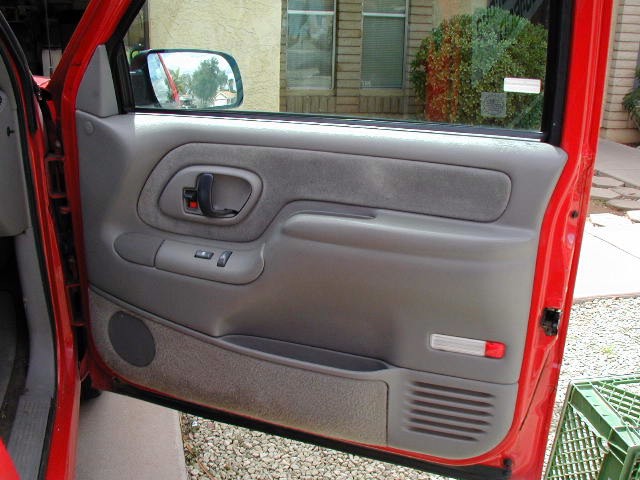
Photo 1
This installation was done on a '95 Silverado, most models will be similar. We will show the right door here, the left is the same.
The first photo shows several pieces that will be removed from the door panel:
- Door handle and lock switch shroud.
- Triangle shaped trim at top inside corner of panel.
- Electric switch panel.
- Courtesy lamp connector (behind panel)
Notice the milk crate off to the side. The milk crate will come in handy to rest the panel on while disconnecting the courtesy light on the lower outside corner of the panel, and again in later steps.
Start by removing the triangle shaped trim panel on the upper inside corner of the panel. It is held onto the door with a single snap clip. Pry the edge up to see the clip behind the panel. Use the flat screwdriver with a small block or the panel popper tool to pop the snap out of the holder in the door metal. If you work carefully, you should be able to reuse all the snap clips holding the panel on the door. Use the block of wood to get enough leverage and proper angle to pop the clips straight out of their holders.
 1
1 Photo 2
It is sometimes easier to remove the panel when the window is down, so make sure it is down at this point.
Remove the inside door handle shroud. It snaps into the door panel in a couple of locations. Work carefully to pry the shroud away from the panel. You can see two of the snap locations on the right end of the shroud and along the top edge. Pry these out first, then remove the shroud.
 2
2 Photo 3
Next, remove the electric switch panel by carefully prying in an upward motion. The module snaps onto the panel in several location so just work your way around the module until it pops up. Don't disconnect the wires yet, you will need to roll the window up when the panel is off.
 3
3 Photo 4
Remove two screws inside the armrest recess.
 4
4 Photo 5
Now you are ready to start popping the clips holding the panel onto the door. Use the panel popper, (or large flat screwdriver with a small block of wood for leverage,) to unseat the clips one at a time until they are all loose.
It is usually easiest to start along the bottom edge of the door. Pry the panel away from the door so you can see the clip locations. Put the tool on the clip head, against the door panel, and pry away from the door metal. If your block of wood is big enough, you should have enough angle to get the long clip out of its' holder. With practice, they will start to pop right out. Wedge the panel away from the door as you progress to keep the clips from pressing back into their holders as you work.
 5
5 Photo 6
Once the panel is released from the door, roll the window up. Leave the window down about 1/2 inch (no more,) to allow easier movement of the metal panel. (See photos 9, 10 and 15.)
Now release the speaker wire connector and the switch module connectors. Be careful since most have a locking tab on the connectors. See the next photo down for a close up of the locking tab.
Before you can pull the panel away from the door, you need to disconnect the courtesy lamp behind the panel.
Skip down two photos to see the lamp close up.
 6
6 Photo 7
This photo shows the locking tab on one of the window switch modules.
 7
7 Photo 8
Gently pull the courtesy lamp from its' holder. Now the door panel can be removed from the door frame.
 8
8 Photo 9
Note: Read this entire step before removing any screws front the metal panel.
Behind the trim panel there is a secondary panel. This panel holds the insides of the door together. By following this tutorial, you will save a lot of install time.
The metal panel is held in place using several sheet metal screws around the perimeter of the panel. Remove them and put them in a little pan or cup so they don't disappear.
This photo shows two important places where the metal panel is bent inward to hook over the door metal. Once all the screws are removed, the weight of the door components and window will be on these two hooks. Make sure they are properly seated before removing the last of the screws. When all screws are out, place the milk crate back under the door, so that you can lower the panel about 4 inches or so and rest it on the crate. This eliminates the need to further disassemble the door components to install the plate.
 9
9 Photo 10
As the metal panel is lowered, the window will come down also. Adjust the milk crate so that the bottom edge of the window allows access to the handle mounting bolt as shown in Photo 11.
This photo shows the metal panel lowered onto the crate. Make sure the crate can't be knocked over because the window will come down hard. Be Careful!
 10
10 Photo 11
The door handle is held in using two bolts. This is the inside bolt. The other bolt is in the door jamb and is not used for this process. There is no need to remove the door handle, lock rods or lock pawl for this installation.
Remove the handle bolt shown in the center of this picture.
Note that the bottom edge of the window is positioned to allow access to the mounting bolt.
 11
11 Photo 12
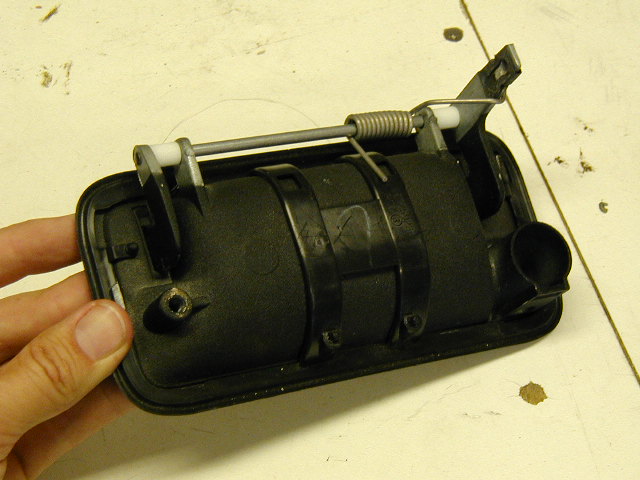
DO NOT REMOVE THE HANDLE! This photo is for demonstration only.
This photo shows one possible problem in the installation process that varies by model year. Later models and replacement handles often have this thick rubber strap across the back of the handle. It is only needed during the molding process of the gasket. Note that the gasket is held in place using two pins near the bottom of the handle. This strap may cause interference by keeping the plate too far from the handle when installed. You can cut the strap so that the middle section comes out, eliminating the problem. The gasket will not be affected. Use a sharp knife or box cutter to cut the rubber at the narrowest points.
Some straps will consist of a single piece across the back. This type is usually thick also and needs to be cut as well.
It is usually not necessary to remove the handle to do this.
 12
12 Photo 13
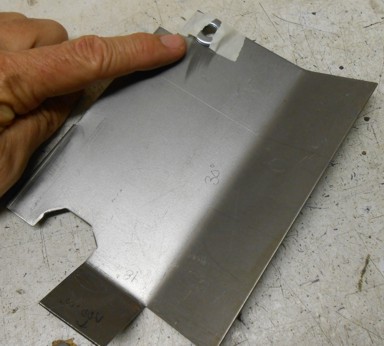
Before bolting the plate in place, check that your door handle doesn't have the strap across the back as described above. If it does, trim out the center of the strap to give the plate a place to rest against the handle.
This photo shows the plate with two of the flat washers taped in place to ease installation. Use two washers between the plate and the door handle mounting post to properly space the plate from the handle.
 13
13 Photos 13a and 13b have handle out of door for clarity. Do not remove your handle to install the Jimmi Jammer.
Photo 13a
Shows two points on the backside of the handle. These protrusions are casting flash from the casting process when the handle was made. The two holes along the top edge of the plate are made to go over these points. Photo 13b shows a close up view of the left point with the plate surrounding it. (Upper right of photo.)
The casting flash may or may not be present on your handle.
Photo 13b
This is a close up of how the plate surrounds the lock assembly. There is no lock in this handle for clarity. This is how the plate should fit around your lock holder on the handle.
 13a
13a
 13b
13b
Photo 14
This shows the plate in place, the two flat washers are between the plate and handle mounting post. The lock washer is under the replacement bolt head. The replacement bolt is needed to reach far enough into the handle to secure the assembly.
Tighten the mounting bolt, then use your door key to rotate the lock a couple of times to make sure there is no interference. Some minor rubbing is not a problem, put a small amount of grease on the plate where the rod moves if there is excessive resistance.
Note: If there is rubbing of the lock rod end on the plate, check that the rod is properly seated in the lock pawl clip. If rubbing is really bad, check that the lock pawl is on so that the bend in the middle of the pawl is away from the plate.
 14
14 Photo 15
Once the plate is in place and the lock mechanism movement is tested and ok, it is time to put the metal panel back in place.
Carefully raise the entire panel upward. The window will also go up.
CRITICAL STEP:
It is very important to re-hook the metal panel over the door metal as shown in this photo. Don't put any screws back in until the panel is positioned in this way.
When the panel is placed properly, reinstall all the sheet metal screws.
15 Now finish this door by re-assembling the door panel in reverse order. Test windows, speakers, courtesy lamp and all other door components before starting the other door.
Don't forget to put your window warning label in each window. It may discourage a thief from even trying to get in your truck.
See the instruction sheet provided with each kit for additional tips.
Thank you.