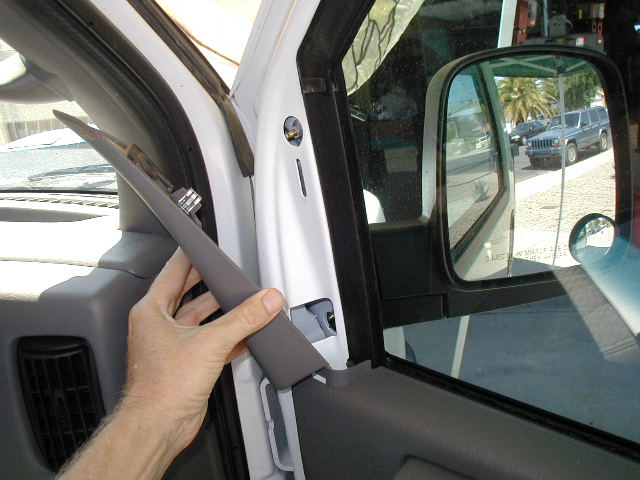
Photo 1
The first photo shows removal of the triangular shaped trim piece above the door panel, inside corner. Remove the trim piece by pulling straight outward away from the door.
This would be a good time to get a little tray to hold your screws and other hardware so you don't lose them.
Note: This tutorial uses photos from both the passenger and driver side doors, but both sides are similar.
 1
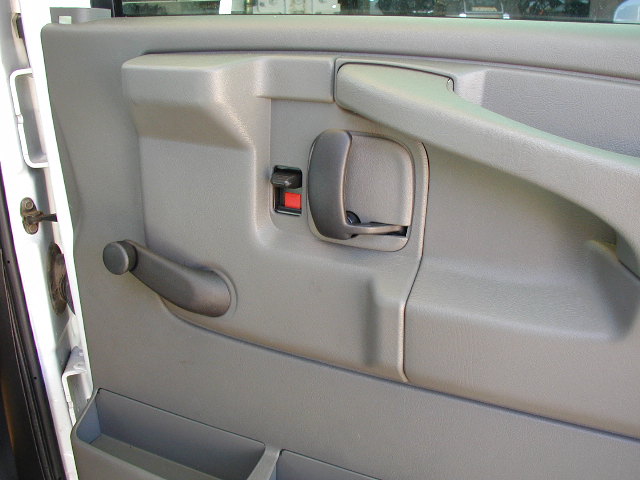
1 Photo 2
Typical door panel with the manual windows. Power window versions are similar, but the switch module must be pulled away from the panel and disconnected.
This photo also shows the shroud around the inside door handle and part of the arm rest cover that must be removed.
 2
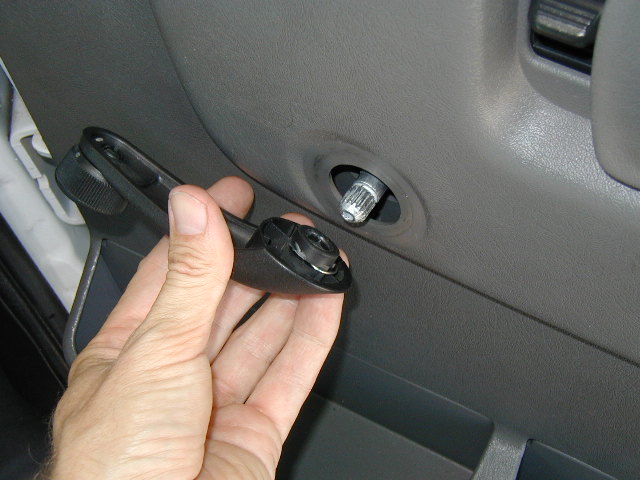
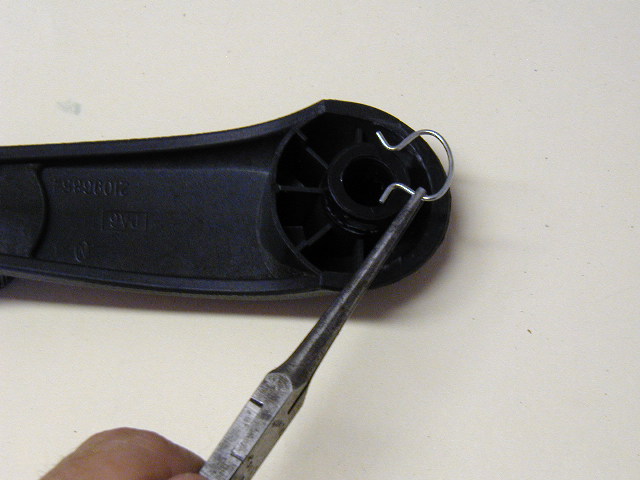
2 Photo 3
Remove the window handle if equipped with manual windows by releasing the C-clip that resides behind the handle. A special tool is sold for removing these clips, but often they can be removed by working the edge of an old t-shirt behind the handle against the open end of the clip. As you work the shirt against the clip, it can be pushed off the window crank shaft.
The open end of the clip is usually aligned with the handle as shown in photo 3a.
If you have the electric windows, the control panel should pry up and out of the door panel. Work carefully as some connections will be hot and could short to your tools.
 3a
3a Photos 3 and 3a
Photo 4
Gently pry the inside handle shroud off the door panel. It snaps in place with plastic tabs.
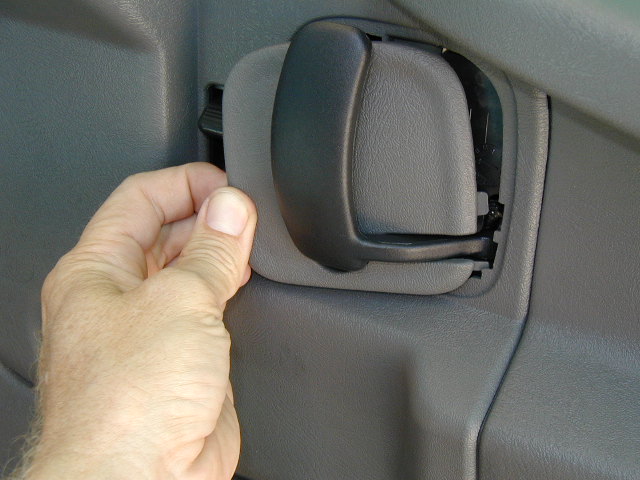 4
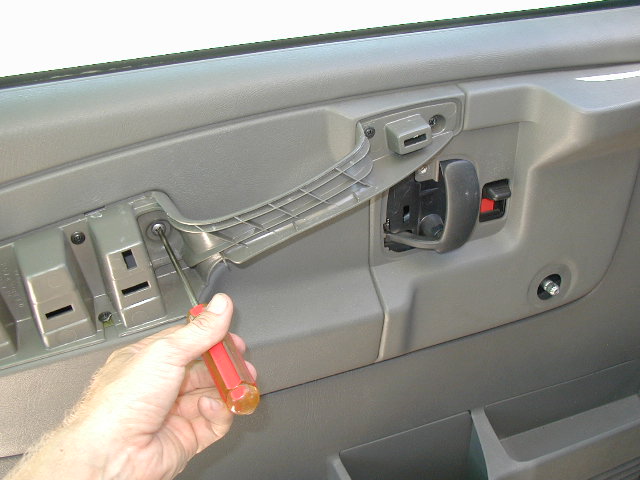
4 Photo 5
Remove two screws behind handle shroud.
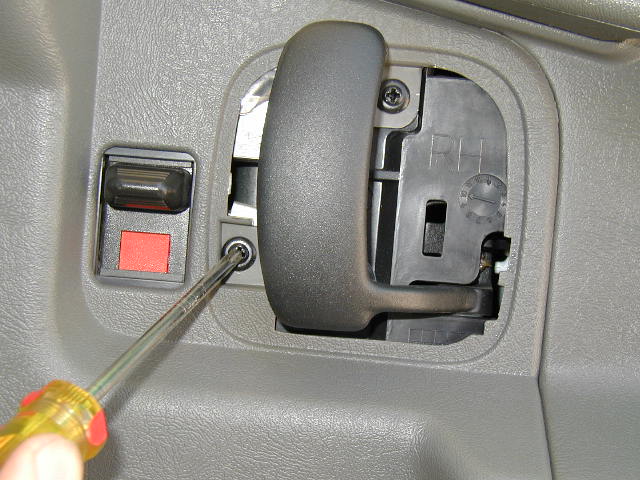 5
5 Photo 6
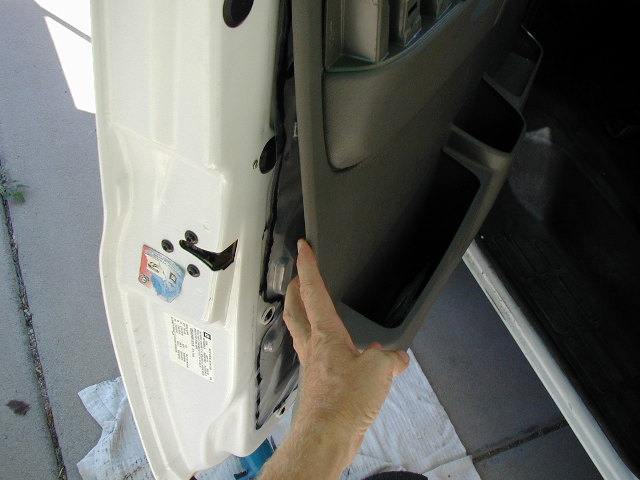
Remove the plastic plug near door jamb. (Passenger side shown here.)
This will allow access to the rear nut on the handle.
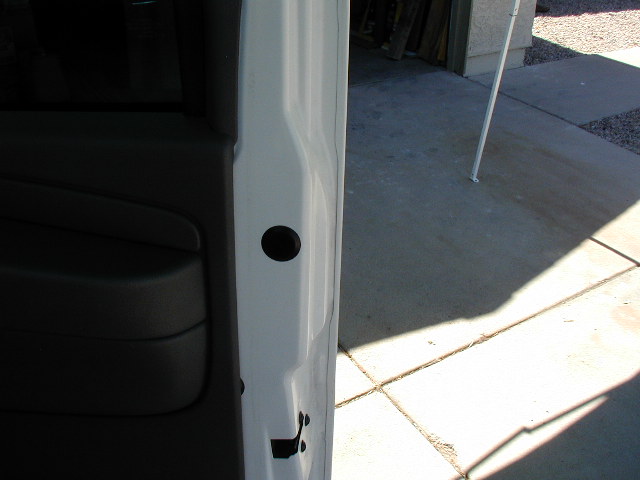 6
6 Photo 7
Remove the cover over the armrest. This cover is held in place by 4 metal snap clips. The cover must be pulled straight back away from panel. It may be helpful to locate the snaps, then use a long screwdriver or panel removal tool to pop the clips out of their mating slots on the door panel. Work carefully to avoid damaging the armrest cover.
Passenger side shown here.
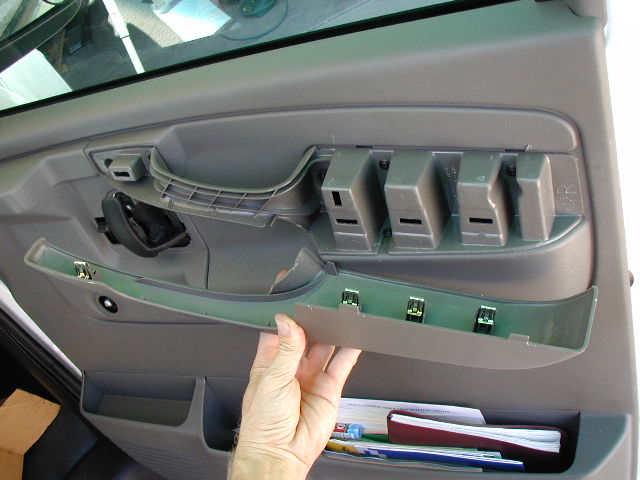 7
7 Photo 8
Remove the two large screws at each end of the armrest pull handle. There are several smaller screws to the left in this picture that do not need to be removed.
 8
8 Photo 9
Pull the door panel away from the door skin enough to get a panel removal tool in to pop the clips out of their mating holes.
If you don't have a panel removal tool, a long screwdriver and a small block of wood can be used to pop the clips out. Get the tip of the screwdriver under the head of the clip, then place the small block under the shaft of the screwdriver to act as a fulcrum. Once the first one is loose, the rest are easier to get to.
 9
9 Photo 10
This picture of the backside of the door panel shows the locations of the snap clips.
3 along the bottom edge.
1 half way up the left edge.
1 3/4 way up the left edge and inset about 3".
The screws remove earlier also hold the panel in place.
 10
10 Photo 11
Peel back the plastic splash guard enough to access the inner door cavity.
Note bolt just to the left of the rectangular hole toward the bottom left of the door panel. This is the window channel bottom holding bolt that can be removed to allow the window channel to move a little. This helps in accessing the handle nuts and putting the plate in place. See next photo.
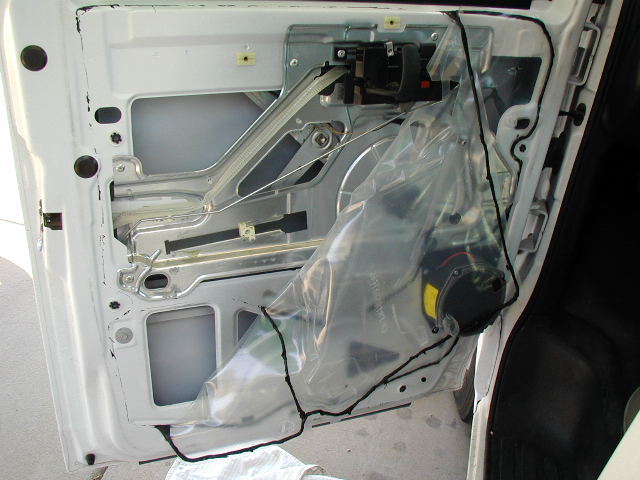 11
11 Photo 12
Removing the window channel lower holding bolt (pass side).
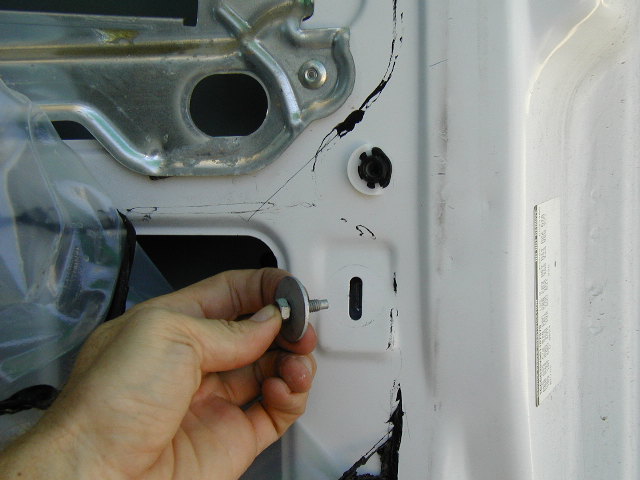 12
12 Photo 13
The handle studs on these door handles are threaded into the handles. Therefore, when the handle nut is turned to loosen it, the stud will often turn too.
It is helpful here to put a vice grip pliers. on the end of the stud, which has no threads, to keep the stud from turning when you break the nut loose. Use a 10mm open end wrench to loosen the handle stud. Loosen only the lower nut.
If you already notice the handle stud is loose, it is best to remove the handle at this point and tighten the stud back in place. Do not over tighten the stud as it may strip out the plastic in the handle.
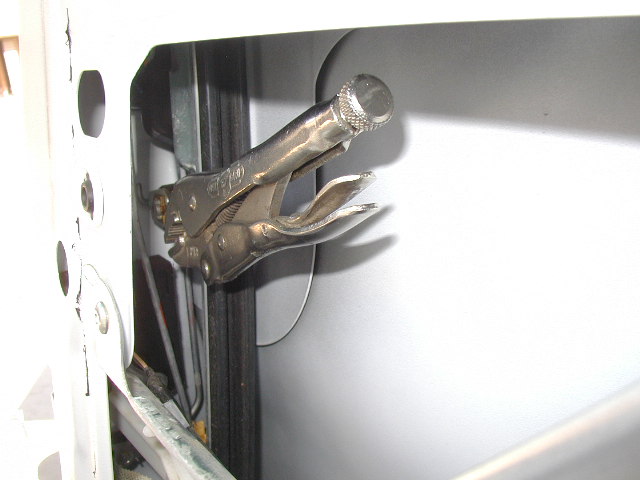 13
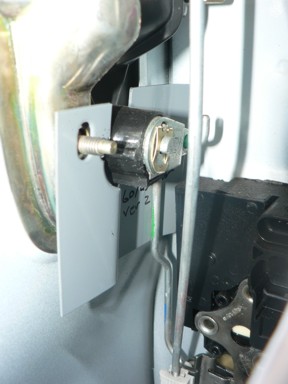
13 Photo 14 applies to 1996-09 vans (2010+ scroll down)
With the handle nut removed, you are ready to install the plate and circular clamp on the handle. Put the plate on first as shown in this photo.
Place the plate on the handle, over the metal bracket that holds the handle to the door. The plate can lay over the stud, on top of the metal bracket. Then, put the handle nut back on and snug it down.
Post ion the clamp and tighten it snugly. Make sure the plate goes on so that the far edge shown here is BEHIND the lock rod.
On the front two doors, the rod is much closer to the door skin, so you have to slip the plate behind the lock rod down below the handle, then move the plate up and into position.
Note: Photo 14 happens to be of the 60/40 side door handle because it was a better image quality than our driver side photo.
Photo 14a applies to 2010 and newer vans
GM changed the handle design slightly for 2010+ models so we have a different plate design for these vans. Photos for the 2010 vans are shown off the van, but the handle does not need to be removed to install the Jimmi' Jammer.
On 2010+ vans, put the circular clamp on first. Photo 14a shows the circular clamp in place. To get the clamp on, you can either:
- Open up the clamp all the way until it separates then put it around the lock
- OR remove the lock pawl from the back of the lock cylinder
-OR disconnect the lock rod at the bottom end and thread the clamp over the rod.
Do whichever method is easiest for you.
Go ahead and tighten it around the lock holder. Then go to photo 15a.
 14
14
 14a
14a
2010 and newer vans
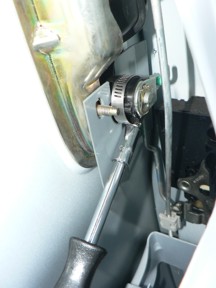
Photo 15 applies to 1996-09 vans (2010+ scroll down)
Position the clamp over the plate and position the head so it can be tightened with a screwdriver or nut driver. To get the clamp in place, you will need to open it up, put it around the lock, then put the clamp ends back together. On the front doors, this is a bit tricky due to limited space to work, but it can be done.
Now tighten the clamp down. The head of the clamp should end up on the bottom of the plate, resting against the plate metal. This will add resistance to handle breakage when the thieves try to pull up on the handle.
Note: This photo happens to be of the 60/40 side door handle because it was a better image quality than our driver side photo.
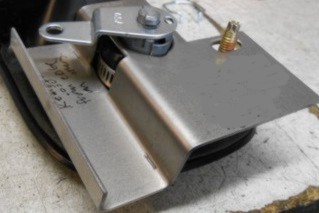
Photo 15a applies to 2010 and newer vans
With the clamp in place, put the Jimmi' Jammer plate in place over the mounting stud.
If lock pawl or rod was removed for clamp installation, put it back on now.
Then, put the nut back on the mounting stud and tighten in place.
Note: Photo 15a shows handle outside of van for clarity, in your installation, it will need to be in the van door.
 15
15
 15a
15a
2010 and newer vans
Photo 16
Now you're ready to add the Lock Stop Screw. This screw will prevent the thieves from smashing the lock straight into the door.
Photo 16 shows a mark made to the door jamb side of the handle nut access hole. This mark should approximately align just above the horizontal center of the access hole, and be about 0.45 inches (about 7/16") from the edge of the hole.
Try to make the hole so the screw will be as straight as possible behind the lock cylinder.
Make a mark as shown.
Double check that when you drill the hole the screw will align with the lock cylinder.
If alignment is correct, drill a 1/4 " hole on your mark. See next photo.
Photo 16 is of drivers door.
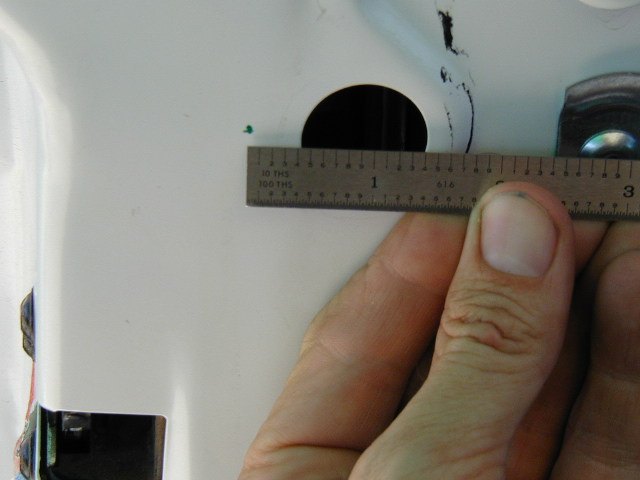 16
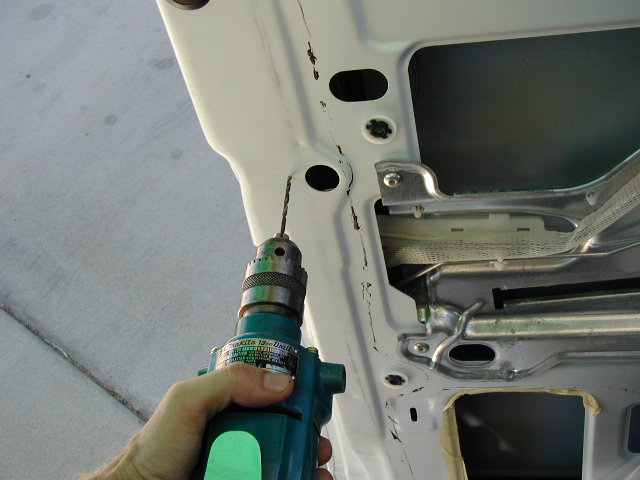
16 Photo 17
Use a 1/4 " bit to drill your hole.
When hole is drilled, put the screw through the hole to check alignment. If correct, put the flat washer over the screw on the inside of the door, then the lock washer and the nut. Secure the screw in place.
It may be necessary to smooth the back side of the door skin to remove the burr from drilling.
 17
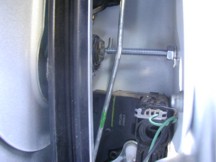
17 Photo 18
Photo 18 shows the lock stop screw in place against the lock. This screw will prevent smashing the lock straight into the door. Note that the screw butts right up to the lock, but should not interfere with lock rotation.
The provided washer goes against the inside of the door skin, then the lock washer and nut.
 18
18 Once the lock stop screw, circular clamp and plate plate are in place, check that each item has been snugged down, and test the movement of the lock mechanism using the key and/or the key fob.
Reverse the order of disassembly to put the door back together.
This completes the installation process. You can now do the other door!
If you have comments or additions that may be helpful, please contact us through the contact page.
To see the tutorial for swing open style side doors, click here.
To see the tutorial for slide open style side doors, click here.
To see the tutorial for rear cargo door, click here

All images and descriptions
©Redline Technical Group, Inc.
1998-current